Welcome to your ultimate guide on how to build a deck in New Zealand! Whether you’re a DIY enthusiast looking to create a stunning outdoor living space or a homeowner wanting to enhance your backyard for entertaining, this step-by-step guide will walk you through the entire process. From planning and choosing the right materials to navigating local building regulations and adding those all-important finishing touches, we’ve got you covered. Building a deck is a great way to increase your home’s value and enjoy the beautiful Kiwi outdoors, and with the right approach, it’s more achievable than you might think. Let’s dive in and get your deck-building journey started!
To build a deck in New Zealand, start by checking local council regulations and obtaining any necessary building consents. Next, plan your deck’s location and size, then prepare the site by clearing and leveling the area. Lay a solid foundation using concrete footings or piles, followed by installing bearers and joists. Secure your decking boards, ensuring proper spacing for drainage. Finally, add railings and stairs if needed, and finish with sanding and sealing to protect against NZ’s weather conditions. Regular maintenance like cleaning and resealing will keep your deck looking great for years to come.
Table of Contents
Why Build A Deck In New Zealand?
Building a deck in New Zealand is a popular and practical choice for homeowners, and it’s easy to see why. A deck adds both aesthetic appeal and functionality to a home, making it a great investment. Here are some key reasons why adding a deck is such a smart decision in New Zealand.
Outdoor Lifestyle
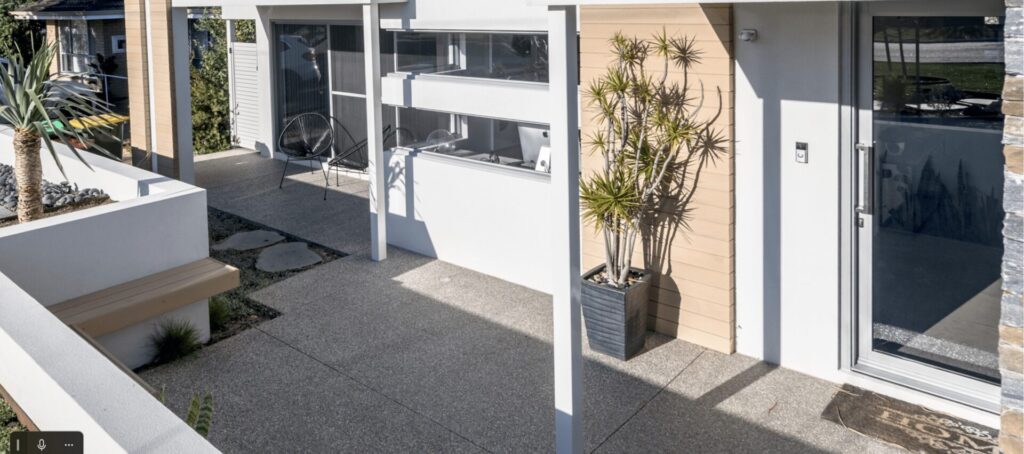
New Zealand is renowned for its strong connection to the outdoors. With its stunning landscapes and beautiful natural scenery, outdoor living plays a major role in Kiwi culture. Whether it’s soaking up the sun, entertaining friends, or simply enjoying the fresh air, a deck provides the perfect setting for outdoor activities. Kiwis love to spend time outside, and a deck creates an inviting space for family barbecues, gatherings, or quiet relaxation. It seamlessly extends your living area, giving you more room to enjoy New Zealand’s gorgeous environment right from your home.
Increased Property Value
A well-designed deck doesn’t just enhance your lifestyle—it also boosts your property’s value. In New Zealand’s competitive real estate market, outdoor spaces are highly sought after by homebuyers. A deck not only improves curb appeal but also increases the usable space of a home, which can significantly raise the property’s market value. Whether you’re planning to sell your home or simply improve its long-term investment potential, adding a deck is a great way to increase its overall worth. Prospective buyers see decks as a bonus, particularly in homes where outdoor living is a priority.
Utilizing Space
One of the most practical reasons to build a deck is the opportunity it provides to maximize outdoor space. Many homes in New Zealand have underutilized or awkward outdoor areas, whether it’s an uneven backyard, a small patio, or a sloping lawn. A deck can transform these spaces into functional, enjoyable areas that are perfect for outdoor dining, lounging, or gardening. Rather than letting valuable outdoor space go to waste, a deck offers a way to make the most of every square meter of your property. It creates a seamless transition between your indoor and outdoor environments, allowing you to enjoy your home’s full potential.
Consider Local Climate
New Zealand’s temperate climate makes outdoor living possible throughout the year, but regional differences should be considered when planning your deck. In the North Island, where the climate can be more humid and wet, it’s important to choose materials that are resistant to moisture and won’t degrade over time. Composite decking or treated timber are popular choices due to their durability and low maintenance requirements. On the other hand, the South Island tends to be drier, with more extreme temperature variations. Homeowners in these areas might opt for natural hardwoods or other materials that can handle both the dry heat and cold winters.
By choosing the right materials based on your local climate, you can ensure that your deck not only looks great but also stands the test of time. Properly maintained decks can last for decades, making them a worthwhile investment for homeowners throughout the country.
Building a deck in New Zealand is more than just adding an outdoor platform—it’s about enhancing your lifestyle, increasing the value of your home, and making the most of your outdoor space. Whether you’re looking to enjoy the sunshine, host gatherings, or simply improve the aesthetic of your property, a deck is a versatile and valuable addition to any Kiwi home. Plus, with careful consideration of New Zealand’s varying climate, you can create a space that is both beautiful and long-lasting.

Planning Your Deck
Building a deck in New Zealand can be an exciting project, but proper planning is crucial to ensure a smooth process and compliance with legal requirements. This section will walk you through the key aspects of deck planning, including legal rules, choosing the best location, and setting a realistic budget.
Legal Requirements and Building Consents
Before you start hammering away, it’s essential to understand the legal requirements set by New Zealand councils. Different regions may have varying regulations, but generally, these rules focus on aspects such as the deck’s height, size, and proximity to boundaries.
1. Deck Height: In most parts of New Zealand, if your deck is less than 1.5 meters above the ground, you typically do not need a building consent. However, for decks that are higher, consents are usually required to ensure they meet safety standards.
2. Size Limits: The size of your deck can also influence whether or not you need council approval. Many councils have a size threshold, such as 20 square meters, after which a consent may be mandatory.
3. Boundary Rules: Another factor is how close your deck is to your property boundary. Most councils require a certain distance to be maintained, especially for higher decks, to protect your privacy and that of your neighbors.
It’s always a good idea to double-check with your local council to get specific details for your area. For more in-depth information on building consents and safety requirements, you can refer to the official NZ Building Code.
Choosing the Location
The location of your deck is a key factor that can significantly impact its usability and comfort. Whether you’re creating an outdoor dining space or a quiet nook for relaxing, here are some important considerations to guide you:
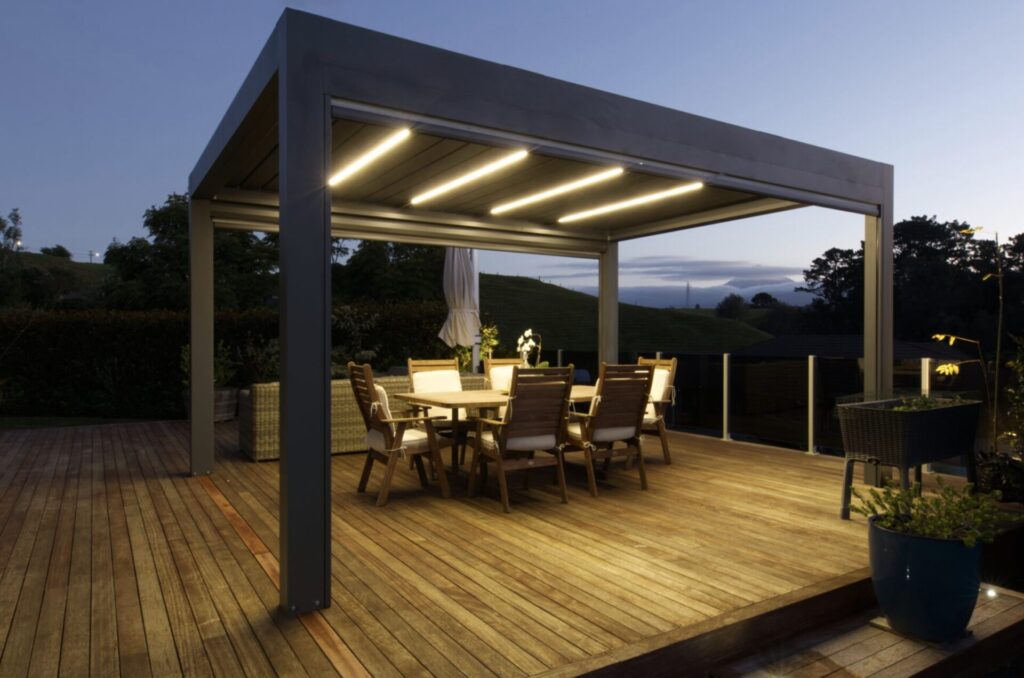
1. Sun Exposure: Pay attention to how much sunlight the area receives. If you want a sun-soaked deck for entertaining or lounging, pick a location with plenty of natural light. Alternatively, if the sun is too harsh, you may want to incorporate shade options like pergolas or umbrellas.
2. Wind Direction: Wind can make or break your outdoor experience, especially in some of New Zealand’s windier regions. Ideally, your deck should be positioned in a sheltered spot or designed with windbreaks in mind, such as planting tall shrubs or installing glass balustrades.
3. Proximity to Trees and Buildings: Think about how close your deck will be to trees or structures. Trees can provide natural shade, but their roots might affect your deck’s foundation, and leaves could require frequent cleaning. Similarly, placing a deck close to your home might create a seamless indoor-outdoor flow, but consider how it might affect light and ventilation inside.
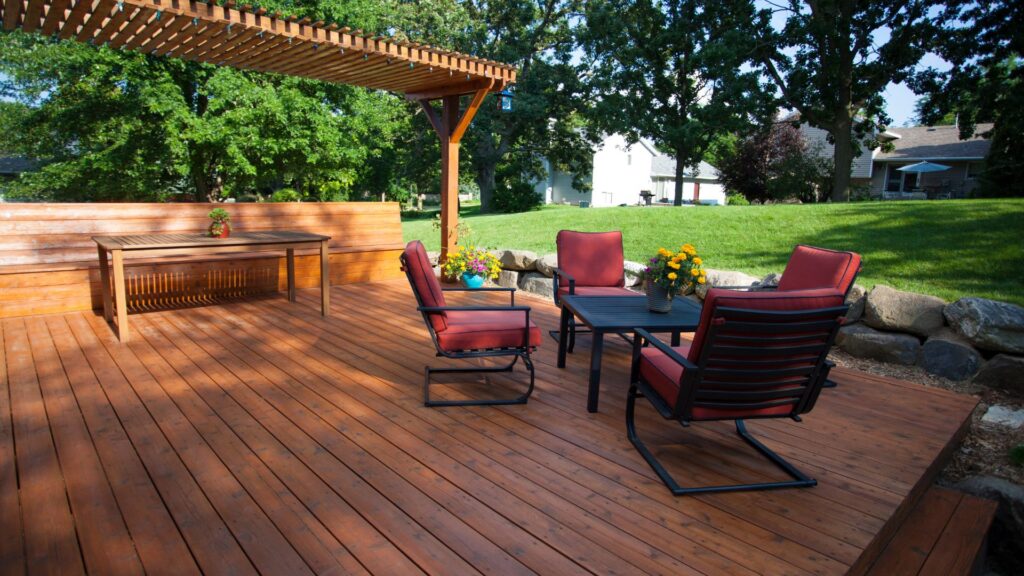
4. Multi-level Deck Ideas: If your backyard is on a slope (which is quite common in many parts of New Zealand), you might consider building a multi-level deck. This design can be both visually appealing and practical, allowing you to make the most of uneven terrain by creating separate zones for different activities, such as dining, lounging, or gardening.
Setting a Budget
One of the first things you should do before starting any deck project is to set a realistic budget. Deck costs can vary widely depending on the size, materials, and complexity of the design. Here’s an outline of what to consider:
1. Material Costs: The type of timber you choose will significantly influence the cost. In New Zealand, common choices include treated pine (affordable and durable) or hardwoods like kwila and vitex (more expensive but premium in quality and appearance). Composite decking is another option, known for being low-maintenance but comes with a higher price tag.
2. Tools and Equipment: If you’re opting for a DIY build, factor in the cost of tools you might need, such as saws, drills, and levels. It may also be worthwhile to rent some equipment if you don’t plan to use them long-term.
3. Labor: Hiring a professional builder will increase costs, but it might be worth the investment for complex designs or if you’re not confident in your DIY skills. The hourly rate for deck builders in NZ typically ranges from $50 to $100, depending on experience and location.
4. Building Permits: Don’t forget to budget for building consents if required. Consent fees can range from $300 to over $1,000, depending on the scope of the project and the council’s requirements.
Tips for Saving Money
- DIY Options: If you’re handy with tools, doing some or all of the work yourself can save a significant amount on labor costs. Just make sure you’re confident in your abilities to comply with safety standards.
- Compare Suppliers: Timber prices can vary between suppliers, so it’s worth shopping around for the best deals. Keep an eye out for sales or bulk purchase discounts.
- Plan for the Future: Build a deck that can be easily expanded or upgraded later if you’re on a tight budget now but envision more elaborate additions in the future.
By carefully planning your deck and considering these factors, you can ensure your project stays on budget while meeting your design and lifestyle needs.
This guide should help you lay the groundwork for a successful deck-building project, ensuring compliance with New Zealand’s building laws, choosing an optimal location, and keeping costs under control. Remember, careful planning is the key to creating an outdoor space that adds value and enjoyment to your home for years to come.

Materials For Decking In New Zealand
Choosing the Right Timber
When selecting timber for your decking in New Zealand, it’s essential to understand the various types of wood available and their unique qualities. The most commonly used timbers for decking in NZ include pine, macrocarpa, and kwila, each offering different advantages depending on your specific needs and preferences.
- Pine: One of the most affordable and widely available options, pine is often treated to resist decay and insect damage. Treated pine is a great budget-friendly option, but it’s important to ensure it’s been properly treated (such as with H3.2) to handle outdoor conditions. While pine is easy to work with and lightweight, it may require more regular maintenance to maintain its appearance and durability over time.
- Macrocarpa: This is a native softwood that offers a more natural and rustic look compared to pine. Macrocarpa is known for its golden color and is naturally resistant to rot, although it doesn’t require the same level of chemical treatment as pine. However, it’s not as durable as some hardwoods and can be prone to cracking or splitting if not properly maintained.
- Kwila: A popular hardwood choice in New Zealand, kwila is highly durable and resistant to moisture, making it ideal for regions with high rainfall or coastal exposure. Its rich reddish-brown color adds a premium feel to any outdoor space. However, kwila can bleed tannins, which may stain surrounding areas like concrete or tiles. It also tends to be more expensive than other timber options, but its long lifespan often makes it worth the investment.
Each of these timber choices has its benefits and trade-offs. Pine is cost-effective but requires more maintenance, macrocarpa has a beautiful natural appearance but may not last as long as hardwoods, and kwila offers top-notch durability but at a higher price point. Consider your budget, maintenance preferences, and the specific climate conditions of your area when choosing the right timber for your decking project.
Sustainable and Eco-Friendly Options
In today’s world, sustainability is a growing concern for homeowners looking to build or renovate. When choosing materials for decking, it’s important to opt for environmentally friendly options to minimize your carbon footprint and support responsible forestry practices.
Look for timber that is certified by the Forest Stewardship Council (FSC) or Programme for the Endorsement of Forest Certification (PEFC). These certifications ensure the timber is sourced from sustainably managed forests, which helps protect ecosystems and promotes the responsible use of natural resources. By choosing certified timber, you contribute to reducing deforestation and support practices that ensure the future health of forests.
Additionally, composite decking has become a popular alternative to traditional wood. Composite decking is made from a mix of wood fibers and recycled plastic, offering an eco-friendly option for those looking to minimize their environmental impact. One of the major benefits of composite decking is its low-maintenance nature. It doesn’t require staining or sealing, and it is resistant to rot, mold, and insect damage, making it perfect for New Zealand’s diverse weather conditions. Although the upfront cost can be higher, the long-term savings on maintenance make composite decking an excellent choice for those seeking a sustainable and hassle-free solution.
Hardware and Fasteners
While choosing the right timber is critical, selecting high-quality hardware and fasteners is equally important for ensuring the longevity of your deck. New Zealand’s coastal regions, in particular, are known for their harsh conditions, including high levels of moisture and salt air, which can quickly cause rust and corrosion.
Using stainless steel screws, nails, and joist hangers is highly recommended in these areas as they are resistant to rust and offer superior strength. Galvanized hardware is also a viable option, providing protection against corrosion, but stainless steel is generally considered the best for long-term durability. Poor-quality fasteners can lead to structural issues over time, causing your decking to warp or even collapse.
By investing in durable hardware, you ensure that your decking remains safe, secure, and visually appealing for many years to come. When planning your decking project, remember that high-quality materials, from timber to fasteners, are essential to building a deck that can stand up to New Zealand’s unique environmental challenges.
In conclusion, the materials you choose for your decking—whether timber, eco-friendly options, or hardware—play a critical role in the overall success and longevity of your project. From selecting the right timber to incorporating sustainable practices and using weather-resistant fasteners, careful consideration of these factors will result in a beautiful, durable deck that enhances your outdoor space for years to come.

Step-By-Step Guide: How To Build Your Deck
Building a deck is an exciting project that enhances your outdoor space, creating a perfect spot for entertaining, relaxing, or enjoying the view. Whether you’re tackling it as a DIY project or with professional help, this step-by-step guide will walk you through the process to ensure a sturdy, beautiful deck that meets all New Zealand building regulations. Follow these steps for a smooth deck-building experience.
Step 1: Preparing the Site
The first and arguably most critical part of building your deck is preparing the site properly. Ensuring the ground is clear and level sets the foundation for a long-lasting structure.
- Clear and Level the Ground: Start by removing any vegetation, rocks, and debris from the area where your deck will sit. Use a shovel to dig out plants, roots, and grass. Once clear, check for high or low spots and level the ground to create a smooth surface. In areas with significant slope, you may need to excavate or fill in soil to create an even base.
- Marking Out the Deck Area: Once the ground is level, it’s time to mark the perimeter of your deck. Use stakes, string lines, and a spirit level to ensure everything is straight and square. The string lines will act as a guide for the edges of the deck, so ensure they are taut and aligned correctly. Check your measurements twice to avoid any future adjustments.
Step 2: Laying the Foundation
A solid foundation is key to the durability of your deck, particularly in New Zealand, where varied soil conditions can impact structural stability.
- Concrete Footings or Piles: Depending on your deck design and the soil type in your region, you’ll need to choose between concrete footings or precast piles. Start by digging holes at each corner and along the perimeter where your footings or piles will go. The depth of these holes will depend on local building codes and the type of soil. For concrete footings, pour the concrete and allow it to set before moving to the next step. For piles, insert them into the ground and secure them as needed. This step ensures your deck will be stable and able to withstand the elements.
- Setting Bearers and Joists: With the foundation in place, it’s time to lay the bearers and joists. Bearers are the horizontal beams that will support the weight of the deck, while joists run perpendicular to the bearers and provide the structure for your decking boards. Ensure the bearers and joists are level and spaced according to your plan. Use a spirit level regularly to check for any unevenness.
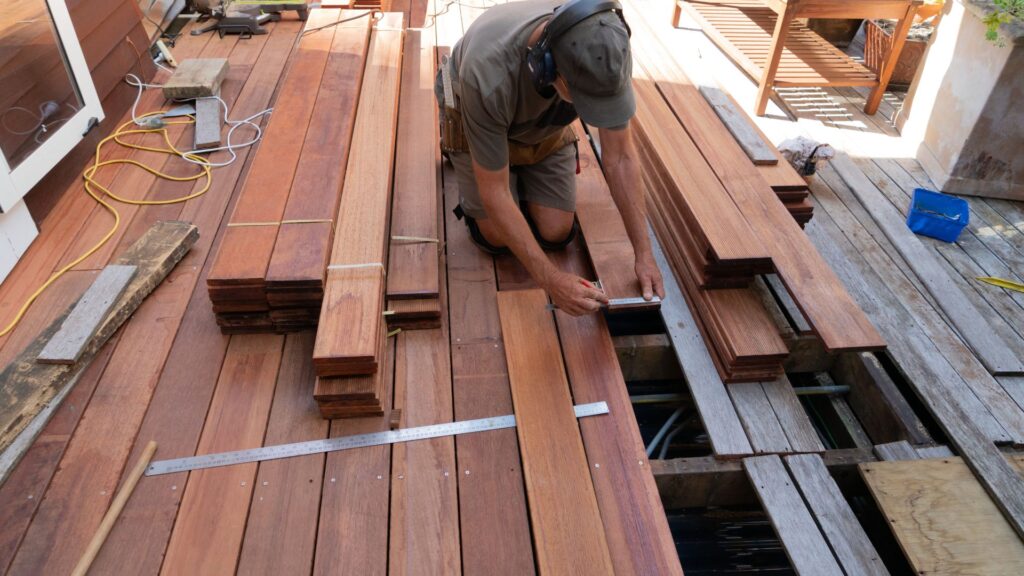
Step 3: Installing the Decking Boards
Now that your deck’s structural base is set, it’s time to lay the decking boards, which will form the surface of your deck. This is where you can start to see the shape of your deck take place.
- Measuring and Cutting the Boards: Before you start installing the boards, measure the deck space carefully. Cut your decking boards to fit the size of your deck, using a saw for precision. Double-check your measurements to avoid mistakes and wasted material.
- Spacing Between Boards: In New Zealand’s often moist climate, proper spacing between boards is essential for timber expansion and drainage. Ensure a gap of 3-5 mm between each board to allow airflow and water drainage. This will prevent the deck from warping or becoming waterlogged during wet seasons.
- Securing the Boards: Fasten the decking boards securely to the joists using rust-resistant screws or hidden fasteners. Stainless steel screws are ideal for outdoor conditions, as they resist rust and corrosion. Take care to screw each board at the ends and where they cross joists to prevent movement over time.
Step 4: Adding Railings and Stairs
For elevated decks, railings and stairs are crucial elements, both for safety and accessibility. Follow New Zealand’s building regulations to ensure compliance.
- Safety Considerations: According to New Zealand building codes, decks higher than 1 meter off the ground must have railings or balustrades for safety. Railings should be at least 1 meter high, and the gaps between balusters should not exceed 100 mm to prevent accidents. Always check the most current regulations before starting.
- Building Stairs: If your deck includes stairs, careful planning is required. To ensure comfortable and safe steps, calculate the rise (vertical height) and run (horizontal depth) of each step, aiming for consistent measurements. A typical rise is about 150-180 mm, while the run is about 250-300 mm. Ensure the stair treads are wide enough for comfort and safety, especially if children or elderly people will use the deck regularly.
Step 5: Finishing Touches
Once the structure is complete, it’s time to focus on the finishing touches that will make your deck both visually appealing and long-lasting.
- Sanding and Sealing: Sand the surface of the decking to smooth out any rough edges or uneven areas, making the deck more comfortable to walk on. After sanding, apply a weather-resistant sealant or stain to protect the timber from New Zealand’s varying climate, especially the rain and UV rays. This will prolong the life of your deck and keep it looking fresh for years to come.
- Decorative Options: Personalize your deck by incorporating decorative elements like built-in seating, planters, or outdoor lighting. Planters can add greenery and soften the hard lines of the deck, while built-in seating provides practical and stylish seating. Outdoor lighting is also a great way to enhance the ambiance of the space, allowing you to enjoy your deck after dark.
Building a deck is a rewarding process that transforms your outdoor space into a functional, beautiful area for relaxation and entertainment. By following these steps carefully and paying attention to detail, you can create a safe, durable, and stylish deck that suits your needs. Always consult New Zealand’s building regulations to ensure compliance and consider hiring professionals if the project feels overwhelming. Enjoy your new deck!

Maintenance Tips For Decks In New Zealand
Proper deck maintenance is essential to ensure that your outdoor space remains in great condition, especially given New Zealand’s unique climate. Here are some practical tips for keeping your deck looking its best year-round, whether you’re in a coastal region or an inland area.
Seasonal Cleaning
Regular cleaning is the cornerstone of deck maintenance. New Zealand’s changing weather patterns, from humid summers to damp winters, can cause a build-up of dirt, moss, and debris, which can lead to long-term damage if left unchecked.
Steps for Seasonal Deck Cleaning
- Remove Debris: Start by sweeping off leaves, dirt, and other debris that accumulate over time. This prevents moisture retention, which can lead to rot or mildew growth.
- Moss and Algae: In regions prone to humidity, particularly in coastal or shaded areas, moss and algae can thrive. Use a gentle deck cleaner or a mixture of water and mild soap to scrub away these growths. For tougher areas, a pressure washer set on a low setting can help, but be careful not to damage the wood.
- Rinse and Dry: After cleaning, thoroughly rinse your deck with water to remove any leftover cleaning solution, and let it dry completely.
Regular seasonal cleaning not only improves the appearance of your deck but also helps maintain its structural integrity.
Resealing and Staining
Given New Zealand’s varied climate, from the intense UV rays in the summer to damp winters, resealing or staining your deck is crucial for longevity. Both the sun and moisture can take a toll on wood, causing it to crack, warp, or fade over time.
How Often Should You Reseal or Stain?
Generally, it’s recommended to reseal or stain your deck every 12 to 18 months, depending on your location and the level of exposure to the elements.
For those living in coastal areas, where salt air can accelerate wear and tear, more frequent maintenance may be required.
Choosing the Right Products
- UV Protection: Look for a deck stain or sealer with UV-blocking properties to prevent the sun from bleaching the wood.
- Water Resistance: In areas with significant rainfall, a water-repellent sealant will help protect the deck from absorbing moisture, reducing the likelihood of rot or mold.
- Durability: Opt for high-quality products specifically formulated for New Zealand’s conditions, such as oil-based stains that penetrate deeply and offer long-lasting protection.
By regularly applying sealants or stains, you’ll keep your deck protected against New Zealand’s harsh weather conditions, extending its life and maintaining its natural beauty.
Inspecting for Damage
Regular inspection is vital, especially if your deck is exposed to extreme conditions, such as salty sea air in coastal regions, which can cause faster deterioration. Even in inland areas, moisture and temperature fluctuations can lead to wear and tear.
Key Areas to Inspect
- Wood Rot: Check for signs of rot, especially in areas where water tends to collect, like the base of posts or beneath outdoor furniture. Rotting wood is often soft to the touch or discolored.
- Fasteners and Nails: Look for rusting nails, screws, or fasteners. Rust can weaken the deck’s structural integrity and lead to unsafe conditions. Replace any rusted components with stainless steel or coated fasteners, which are more resistant to corrosion.
- Cracks and Splits: Examine the boards for cracks, which can occur from prolonged exposure to the sun or moisture. Small cracks may not be an immediate concern but should be monitored, as they can expand over time.
By performing routine checks and addressing minor issues early, you can avoid costly repairs and ensure your deck remains safe and functional for years to come.
Maintaining a deck in New Zealand requires ongoing attention, but by following these seasonal cleaning tips, resealing or staining as needed, and regularly inspecting for damage, you can preserve the beauty and durability of your outdoor space. Keep in mind the specific challenges posed by New Zealand’s climate, and use high-quality products designed to withstand local conditions for the best results.

Common Mistakes To Avoid When Building A Deck
Building a deck can greatly enhance your outdoor living space, but it’s important to avoid some common pitfalls that many homeowners encounter. Mistakes in planning, material selection, or construction can lead to costly repairs or even safety hazards. Let’s break down the key mistakes to avoid so that your deck-building project goes smoothly and lasts for years to come.
1. Improper Planning
One of the most critical phases of building a deck is the planning stage. Without proper planning, you could end up with a deck that doesn’t meet your needs or functions poorly. Here’s why planning matters:
- Size and Layout Issues: When designing your deck, you must consider how much space is needed for various activities, such as placing furniture, a BBQ grill, or even setting up an outdoor dining area. Too often, homeowners overlook these aspects, leading to a cramped deck that can’t accommodate the intended use. It’s essential to plan for enough space not just for items, but also for ease of movement around the deck.
- Future Growth: Another aspect often missed is planning for potential future expansions or enhancements, such as adding outdoor lighting, seating, or a pergola. Taking future needs into account can save you from having to make major alterations later.
2. Skipping the Building Consent Process
Overlooking the legal requirements can be a costly mistake when building a deck. In New Zealand, certain types of decks require building consent, and failing to get the proper approvals can lead to serious consequences.
- Non-Compliance Penalties: If your deck doesn’t comply with local building codes, you may face fines, or worse, you could be forced to dismantle your deck entirely. This not only adds to your expenses but also wastes time and effort.
- Safety Concerns: The building consent process ensures your deck is constructed safely and to standard. Skipping this step can lead to structural issues that could compromise the safety of your deck, putting both your family and guests at risk.
3. Choosing the Wrong Materials
The materials you choose for your deck play a huge role in its longevity and performance. Selecting the wrong materials can lead to premature wear and tear, especially in New Zealand’s diverse and sometimes harsh climate.
- Climate Considerations: NZ’s weather can vary significantly, from coastal regions prone to saltwater exposure to areas that experience heavy rainfall or strong UV rays. If you choose materials that aren’t suited to your local conditions, your deck could deteriorate faster than expected. For example, untreated timber might rot or warp quickly in wet environments, while some materials may fade or crack under intense sunlight.
- Maintenance Requirements: Some materials require more maintenance than others. Homeowners who fail to consider this might end up with a deck that requires constant upkeep to avoid damage. Opting for low-maintenance, weather-resistant materials can save you time and money in the long run.
4. Incorrect Spacing of Joists or Decking Boards
Structural integrity is crucial when building a deck, and one of the most common mistakes is incorrect spacing of joists or decking boards.
- Instability and Sagging: If joists are spaced too far apart, your deck may feel bouncy, and over time, it could begin to sag or warp. This not only affects the appearance and feel of the deck but also compromises its strength and durability. Always follow the manufacturer’s recommendations or local building codes for proper joist spacing to ensure stability.
- Water Drainage Issues: Decking boards that are spaced too closely together may not allow for adequate water drainage, which can lead to pooling water and eventual rot. On the other hand, boards spaced too far apart can create gaps that are uncomfortable or unsafe for walking, especially for small children or pets. Proper spacing ensures both safety and longevity.
Avoiding these common mistakes can make the difference between a deck that lasts for years and one that requires constant repairs or even replacement. By investing time in proper planning, adhering to local building regulations, choosing the right materials, and ensuring correct spacing during construction, you’ll enjoy a safe, functional, and beautiful outdoor space for years to come.
Whether you’re taking on the project yourself or hiring professionals, keeping these pitfalls in mind will ensure that your deck-building experience is a success.

FAQs: About How To Build A Deck Nz
Do I need a building consent to build a deck in New Zealand?
Yes, you may need a building consent depending on the height and location of the deck. In most cases, if your deck is more than 1.5 meters above ground level, you will need consent. It’s always a good idea to check with your local council to confirm specific regulations in your area.
What is the best wood for decking in New Zealand?
Commonly used woods for decking in NZ include pine, macrocarpa, and kwila. Pine is popular for its affordability and ease of use, while kwila is known for its durability and rich color. Composite decking is also becoming a popular low-maintenance option.
How much does it cost to build a deck in New Zealand?
The cost to build a deck in NZ varies depending on the size, materials, and complexity. On average, expect to pay between $300 and $600 per square meter, which includes materials and labor. DIY can reduce costs, but remember to factor in any council fees for building consents.
How long does it take to build a deck?
The time it takes to build a deck depends on the size and complexity of the project. For a small DIY deck, it may take 1-2 weekends, while larger or more complex decks could take several weeks, especially if building consents and inspections are required.
What is the ideal spacing between decking boards?
The standard spacing between decking boards in NZ is usually around 3-5mm. This allows for proper drainage and timber expansion due to moisture, which is important in NZ’s varying climate conditions.
What are the legal requirements for deck railings in New Zealand?
If your deck is higher than 1 meter above the ground, NZ regulations require that it have railings for safety. The height of the railing should be at least 1 meter above the deck surface, and the gaps between balusters should not allow a 100mm sphere to pass through.
Can I build a deck on uneven ground or a sloped backyard?
Yes, you can build a deck on uneven or sloped ground by adjusting the height of the support posts or using a multi-level design. Using adjustable footing systems or installing concrete piles at different depths can help level the structure.
What maintenance does a deck in New Zealand need?
Decks in NZ require regular maintenance to prevent damage from moisture, UV rays, and mildew. This includes cleaning the deck surface, removing debris, and applying a protective sealant or stain every 1-2 years. Regular inspections for signs of rot or damage are also recommended.
Can I build a deck in coastal areas of New Zealand?
Yes, but special care should be taken to choose corrosion-resistant materials due to the high salt content in coastal air. Stainless steel or galvanised fasteners are recommended, and selecting durable, weather-resistant timber like hardwoods or treated pine is essential.
What should I do if my deck shows signs of damage or rot?
If you notice any signs of damage, such as rotting timber, loose boards, or rusted fasteners, repair or replace the affected parts as soon as possible. For small repairs, you can replace damaged boards, but for severe rot, you may need to consult a professional to assess the deck’s structural integrity.
Conclusion
In conclusion, building a deck is a rewarding project that can transform your outdoor space into a functional and inviting area. By following the essential steps outlined in this guide—from planning and choosing materials to construction and finishing—you’re well on your way to creating a beautiful and durable deck. Congratulations on taking the first steps toward this exciting improvement! We encourage you to share your deck-building journey or ask any further questions in the comments section below, and don’t forget to bookmark this page for future reference. Finally, remember that regular maintenance is key to keeping your deck in top shape for years to come, ensuring that it remains a standout feature of your home.
About the Author:
Mike Veail is a recognized digital marketing expert with over 6 years of experience in helping tradespeople and small businesses thrive online. A former quantity surveyor, Mike combines deep industry knowledge with hands-on expertise in SEO and Google Ads. His marketing strategies are tailored to the specific needs of the trades sector, helping businesses increase visibility and generate more leads through proven, ethical methods.
Mike has successfully partnered with numerous companies, establishing a track record of delivering measurable results. His work has been featured across various platforms that showcase his expertise in lead generation and online marketing for the trades sector.
Learn more about Mike's experience and services at https://theleadguy.online or follow him on social media: