Welcome to your ultimate guide on how to build steps for a deck in New Zealand! Whether you’re looking to improve the accessibility of your outdoor space or add a polished, functional touch to your elevated deck, creating safe and sturdy steps is an essential project. In this guide, we’ll walk you through everything you need to know, from planning and choosing materials to constructing the steps in compliance with New Zealand building standards. Building deck steps may seem daunting at first, but with the right tools, a bit of know-how, and our step-by-step instructions, you’ll be able to enhance both the safety and style of your deck in no time. Let’s dive in and start your journey toward a better outdoor space!
To build steps for a deck in New Zealand, start by measuring the height from the deck to the ground and calculating the number of steps needed, typically with a rise of 180mm and a run of 270mm per step. Choose durable materials like treated pine or hardwood to withstand NZ’s climate. Secure stringers to the deck frame and footings, then attach treads and optional risers. Follow NZ building codes and consider adding non-slip features and a handrail for safety. Proper planning and quality materials will ensure your deck steps are both safe and long-lasting.
Table of Contents
Planning And Preparation
When building steps for your deck, proper planning and preparation are crucial for a safe and functional result. In this step-by-step guide, we’ll break down the key aspects of designing and preparing your deck steps, including assessing your deck layout, measuring the height and depth, calculating the number of steps, and ensuring compliance with local building regulations, specifically in New Zealand.
1. Assessing Your Deck’s Layout
Before you begin building your steps, it’s important to evaluate the layout of your deck and determine the ideal location for the staircase. The placement can significantly impact both the visual appeal and functionality of your deck.
- Choose the Best Location: Decide whether the steps will be positioned at the center, side, or corner of the deck. Consider where the steps will provide the most convenience and ease of access, especially if your deck leads to a garden, patio, or pathway.
- Identify Obstacles: Check for any potential obstacles such as trees, garden beds, or existing structures that might hinder the placement of the steps. You’ll want to avoid any areas where the steps could interfere with landscaping or utilities.
- Evaluate Available Space: Ensure you have enough space to accommodate the steps without crowding the deck or nearby areas. You may need to adjust the width or layout of your stairs depending on the available room, making sure the steps feel neither too narrow nor too steep.
2. Measure the Height (Rise) and Depth (Run)
The next critical step in planning your deck stairs is to measure the height from the deck to the ground, known as the “rise,” and the depth of each step, referred to as the “run.” Proper measurements will ensure the steps are comfortable, safe, and meet local building codes.
- Measure the Rise: Start by measuring the vertical distance from the surface of the deck to the ground directly below. This will give you the total height that your stairs need to cover. The height of the rise will directly affect how many steps are required.
- Calculate the Run: To ensure the stairs are not too steep or too shallow, you’ll also need to calculate the run (horizontal depth) of each step. A comfortable run is crucial for safe and easy-to-use steps, and it’s often determined by the total horizontal distance the stairs will cover from the deck to the landing spot.
3. Determine the Number of Steps
With your rise and run measurements in hand, you can calculate the number of steps required. The formula to determine the number of steps follows a simple rule:
- Step Height and Depth Formula: In New Zealand, the typical step height (rise) is around 180mm, and the depth (run) of each step should be about 270mm, according to the NZ Building Code. Divide the total height (rise) by 180mm to determine how many steps are needed.
For example, if the total rise is 900mm, you would divide 900 by 180, resulting in 5 steps.
- Adjust if Necessary: If your measurements result in steps that are too tall or too shallow, you may need to slightly adjust the rise or run to create stairs that are both comfortable and code-compliant.
4. Obtain Necessary Permits
Before you begin construction, it’s essential to verify if you need a building consent. In New Zealand, the NZ Building Code sets regulations for building structures, including deck stairs.
- When a Permit is Required: In general, a building consent may be needed if your deck is higher than 1.5 meters or if the stairs will significantly alter the structure of your deck. Regulations vary between regions, so it’s important to consult with your local council to determine the specific requirements for your area.
- Compliance with Local Regulations: To avoid fines or having to redo your work, ensure that your staircase complies with local building codes. If you are unsure about any aspect of the process, it’s always a good idea to consult a professional builder or your local council for advice.
By following these steps, you’ll be well on your way to building safe, functional, and attractive steps for your deck that comply with New Zealand’s building standards. Proper planning will ensure the entire process goes smoothly and that the final product enhances both the safety and aesthetic appeal of your outdoor space.

Choosing The Right Materials
When building deck steps in New Zealand, the choice of materials is crucial. Not only do you want to create a visually appealing and functional outdoor area, but you also need materials that can withstand New Zealand’s unique climate. Let’s dive into the best options for timber, safety measures, and essential hardware to ensure your deck steps are sturdy, safe, and long-lasting.
Timber Options for Deck Steps
Choosing the right type of timber is the first step in ensuring your deck steps are durable and aesthetically pleasing. In New Zealand, three types of timber are commonly used:
- Pine: Pine is a popular and affordable choice for deck steps. It’s widely available across New Zealand and is typically treated to withstand outdoor conditions. Treated pine can resist decay and insect damage, making it a durable option. However, regular maintenance like staining or oiling is essential to protect it from the elements, especially in areas with high rainfall.
- Macrocarpa: Macrocarpa is a native timber that is naturally resistant to rot and moisture. Its durability makes it an excellent choice for outdoor use, particularly in coastal regions. Macrocarpa also has a warm, golden hue that enhances the natural beauty of your deck steps. While it requires less maintenance than pine, occasional oiling will help maintain its rich color and protect it from the harsh New Zealand climate.
- Kwila: Known for its strength and deep reddish-brown color, Kwila is a premium hardwood option. It’s highly resistant to weathering and perfect for areas exposed to a lot of moisture. However, Kwila can bleed tannins, so it’s essential to seal the wood properly to avoid staining nearby surfaces. Its natural oils make it an excellent choice for longevity, but Kwila does require an upfront investment compared to other timber options.
When selecting timber, consider your region’s weather conditions. In wetter areas, such as the West Coast or Wellington, choosing a highly durable, moisture-resistant timber like Kwila or Macrocarpa is vital for longevity.
Non-Slip Materials for Safety
New Zealand’s climate, characterized by frequent rain and coastal humidity, can make outdoor surfaces slippery. To enhance the safety of your deck steps, especially in damp conditions, non-slip materials are a must.
- Non-Slip Treads: Adding non-slip treads to your deck steps is an easy and effective way to prevent accidents. These treads are usually made from rubber or metal and can be attached to the steps to provide extra grip, even when wet.
- Rubber Grips: Rubber grip strips are another excellent option for improving traction on your deck steps. They are especially useful in high-traffic areas or on stairs frequently exposed to rain. Rubber grips are durable, weather-resistant, and easy to install.
- Textured Wood Finishes: If you prefer an all-wood design, consider opting for textured wood finishes that provide natural traction. Grooved or ridged timber can help prevent slipping without compromising the aesthetics of your deck. Be sure to choose a finish that is suitable for outdoor use and resistant to moisture.
Safety should always be a top priority, especially in homes where children, elderly family members, or pets frequently use the stairs. Implementing non-slip materials will not only provide peace of mind but also extend the usability of your outdoor space throughout the year.
Essential Hardware and Tools
To build your deck steps properly, you’ll need the right tools and hardware. Here’s a list of what you’ll require:
Tools
- Saw (circular or hand saw for cutting timber)
- Drill and drill bits
- Measuring tape
- Carpenter’s square
- Level
- Hammer or nail gun
- Shovel (for digging footings)
Hardware
- Galvanized or stainless steel screws and nails (to prevent rusting in outdoor conditions)
- Timber posts or stringers for structural support
- Concrete mix for securing footings
- Non-slip treads or rubber grips for added safety
- Wood sealant or paint for finishing touches
When sourcing materials, it’s crucial to use hardware that is corrosion-resistant, particularly in coastal areas where salt air can accelerate rust. Galvanized or stainless steel screws and nails are highly recommended for outdoor projects to ensure long-lasting durability.
If you’re wondering where to get these supplies, Bunnings and Mitre 10 are excellent options. These popular hardware stores in New Zealand offer a wide range of timber, tools, and safety materials, and their staff can often provide useful advice for your specific project. Additionally, they frequently carry materials that are well-suited to New Zealand’s unique climate conditions.
Choosing the right materials for your deck steps is an essential part of building a safe, functional, and long-lasting outdoor space. In New Zealand’s varied climate, it’s important to pick timber that suits your environment, incorporate non-slip elements to prevent accidents, and use durable hardware that can withstand the elements. With proper planning and high-quality materials, your deck steps will not only enhance your home’s aesthetics but also provide a safe and reliable access point to your outdoor area for years to come.

Building The Foundation
In this step, you’ll focus on creating a strong foundation for your steps, which is key to ensuring long-term stability and safety. Whether you’re building stairs for a deck, entrance, or garden, a solid base is essential, particularly when dealing with uneven terrain or challenging weather conditions.
Setting the Footings
Footings play a crucial role in supporting the structure of your steps. They provide the base upon which the stringers (the diagonal pieces that support the steps) will rest, ensuring that the entire staircase remains stable over time. Here’s a breakdown of how to approach this:
1. Digging the Footings
If you’re working on uneven or soft ground, you’ll need to dig holes for the footings to provide a solid base. The depth of these holes should be at least 200-300mm, depending on the ground conditions. For particularly uneven areas, digging deeper ensures the steps won’t shift over time.
2. Concrete Footings
In many cases, using concrete footings is the best option, especially in earthquake-prone regions like New Zealand. Concrete offers additional security by anchoring the stringers into the ground, which is essential for keeping the steps firmly in place, even when the earth moves. After digging your holes, fill them with concrete, ensuring it’s level and allowing it to cure properly before proceeding with the construction of your steps.
Preparing the Ground
Equally important to securing your footings is preparing the ground underneath your steps. This is particularly vital in New Zealand, where wet conditions are common, and poor drainage can lead to a soggy, unstable base.
1. Leveling the Ground
If the area where you’re building is uneven, take the time to level it out before placing your steps. A flat surface will provide better support and reduce the chances of your stairs settling unevenly over time. Use a shovel or a tamper to flatten the area where your footings and stringers will rest.
2. Gravel for Drainage
Adding a layer of gravel beneath your steps is highly recommended. Gravel promotes drainage, preventing water from pooling under your stairs, which could lead to moisture problems or wood rot. This is especially important in New Zealand’s climate, where frequent rain can quickly turn your foundation into a muddy mess if not properly managed.
By taking these steps to secure the footings and prepare the ground, you’ll lay the foundation for a sturdy and long-lasting staircase. Remember, careful preparation at this stage will save you time and effort down the line, as well as ensure the safety and durability of your steps, no matter the conditions.

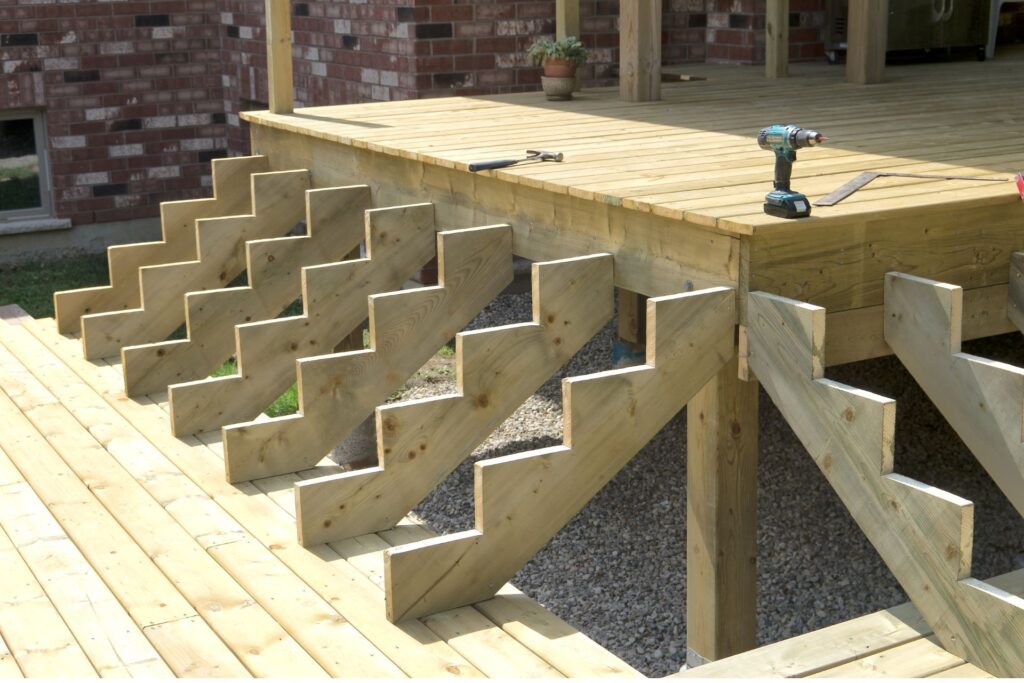
Constructing The Stringers
When building a set of stairs for a deck or other outdoor structure, constructing and installing stringers is one of the most critical steps. Stringers are the backbone of any stair system, providing the essential support needed to carry the weight of the steps and anyone using them. In this section, we’ll dive into what stringers are, how to construct them, and how to attach them securely to both the deck and footings.
What Are Stringers?
Stringers are the long, diagonal pieces of wood or metal that support the steps of a staircase. They run from the base (often anchored into the ground or footings) up to the deck or structure. Each stringer is notched to create spaces for the stair treads, and they are key to ensuring your stairs are both stable and safe to use.
To construct the stringers, you first need to determine the rise and run of your stairs:
- The rise is the vertical height from one step to the next, typically around 7 to 8 inches.
- The run is the horizontal depth of each step, usually about 10 to 11 inches.
Using these measurements, you’ll mark and cut your stringers to fit the exact dimensions of your stairs. Most staircases will need at least two stringers (one on each side), but wider stairs may require three or more for additional support.
Cutting Stringers to the Right Size
Once you have your rise and run measurements, you’ll need to lay out the stringer pattern on a suitable piece of lumber. Commonly, builders use pressure-treated 2×12 boards for outdoor staircases because of their strength and durability. Here’s a quick breakdown of the process:
- Measure the total rise (the height from the top of the deck to the ground) and divide it by the height of each step (the individual rise) to determine how many steps you’ll need.
- Use a framing square to mark the rise and run for each step onto the 2×12. Position the square on the board, and carefully trace the rise along one side of the square and the run along the other.
- Cut along your markings using a circular saw, making precise, clean cuts for each step. Be mindful not to overcut, as it can weaken the stringer. Finish any inside corners with a handsaw for accuracy.
After cutting the stringers, check that they fit properly against the deck frame and footings before proceeding.
Attaching Stringers to the Deck
Once your stringers are cut, it’s time to attach them securely to the deck frame. Proper attachment is critical to ensuring your stairs don’t wobble or shift underfoot.
Follow these steps to safely attach the stringers to the deck:
1. Position the Stringers: Place the top of the stringers flush with the edge of the deck, ensuring they are evenly spaced and aligned.
2. Use Brackets or Joist Hangers: Attach the stringers to the deck using metal brackets or joist hangers. These hardware components provide a solid connection point and ensure the stringers stay securely fastened over time.
- Brackets: Metal brackets, typically L-shaped, are screwed into the deck framing and the top of the stringers.
- Joist Hangers: Similar to brackets, joist hangers cradle the end of the stringer and secure it firmly to the deck joist.
3. Double-Check Alignment: Before finalizing the attachment, ensure that the stringers are perfectly level and equally spaced. Uneven stringers can result in unsafe, uneven stairs.
Securing Stringers to Footings
The bottom of the stringers must also be anchored to the ground or footings to prevent movement, ensuring the stairs remain stable for years to come. Here’s how to secure the stringers at the base:
1. Prepare the Footings: If your stairs are free-standing or require extra support, you may need to install concrete footings at the base of the stringers. Footings provide a solid, immovable base for the stairs. Dig holes, pour concrete, and allow it to cure before attaching the stringers.
2. Anchor the Stringers: Once your footings are ready, use metal post bases or brackets to attach the bottom of the stringers to the concrete footings. These brackets are typically anchored to the concrete with heavy-duty bolts, ensuring that the stringers remain securely in place.
3. Stabilize in the Ground (if applicable): If you’re building on solid ground and footings aren’t required, make sure to dig out a small trench beneath the stringers and fill it with gravel or another sturdy material to prevent shifting.
By following these steps to construct and secure your stringers, you’ll create a sturdy, durable staircase that will provide safe access to your deck for years to come. Properly installed stringers form the backbone of any stair system, making them a key part of your deck’s overall safety and functionality.

Installing The Treads And Risers
Once you have prepared your stringers and your stair framing is in place, the next critical step is installing the treads and risers. This process requires precision, attention to detail, and a focus on safety to ensure your stairs are both functional and visually appealing.
Cutting and Attaching the Treads
1. Measure Twice, Cut Once: The old saying holds true when installing stair treads. Begin by measuring the width of the stair opening between the stringers (the angled boards that support the treads). Always double-check your measurements before cutting. Use a high-quality tape measure to ensure accuracy. Remember, even a small error can lead to uneven or ill-fitting treads, which could be unsafe or unsightly.
2. Cut the Treads: Use a circular saw or table saw to cut each tread to the appropriate width and length based on your measurements. When cutting, it’s important to account for any inconsistencies in your walls or stringers, especially in older homes where measurements can vary slightly. If you’re working with hardwood or another premium material, take your time to avoid splintering the edges.
3. Check for Fit and Level: Before permanently attaching the treads, dry-fit them onto the stringers. Make sure they fit snugly but not too tight, as wood can expand and contract with changes in humidity. After placing each tread, use a carpenter’s level to confirm that it’s perfectly horizontal. Uneven treads can create dangerous tripping hazards and should be corrected before proceeding.
4. Attach the Treads: Once you’re satisfied with the fit, use construction adhesive on the stringers where the treads will sit. The adhesive provides extra strength and reduces creaking over time. After applying the adhesive, position the tread and use screws or nails to secure it in place. Be sure to countersink your screws so they sit flush with the wood or slightly below the surface. This prevents them from sticking out and posing a tripping hazard. For a cleaner look, fill in the screw holes with wood putty and sand them smooth before finishing.
Optional: Installing Risers
1. Purpose of Risers: Risers are the vertical boards that close off the space between the treads. They provide structural support, help prevent dirt and debris from falling between the stairs, and can give the staircase a more finished and elegant look. However, not all staircases require risers, especially if you’re going for an open or modern design. In these cases, you may choose to leave the space between the treads open.
2. When Risers Are Necessary: Risers are typically required for indoor staircases to create a more traditional and enclosed appearance. They can also add stability to the structure, making the stairs sturdier and more secure. For outdoor stairs, risers are usually optional and may be omitted if you’re going for a more open, breathable design.
3. Installing Risers: If you choose to install risers, follow a similar process to that of the treads. Cut each riser to the width of the staircase, ensuring it fits snugly between the stringers. After dry-fitting, apply adhesive along the back of the riser and secure it with nails or screws. Make sure that the riser sits flush with the underside of the tread above it. This will create a seamless look and prevent gaps.
Safety Considerations
1. Rounded Edges for Safety: It’s highly recommended to round the edges of your treads rather than leaving them sharp. Sharp corners on stair treads can cause injury, especially in homes with children or elderly residents. A rounded edge, also known as a “bullnose” finish, not only enhances safety but also provides a smoother, more professional appearance.
2. Proper Step Spacing: One of the most critical factors in stair safety is ensuring the proper spacing between each step. Building codes often specify a maximum and minimum rise (the height between each tread) and run (the depth of the tread). It’s essential to adhere to these guidelines to prevent accidents. If the rise is too high, people may trip; if it’s too low, the stairs could feel awkward or uncomfortable to use.
3. Slip-Resistant Treads: Consider using slip-resistant materials or applying anti-slip strips to the treads, particularly for outdoor stairs. This extra precaution can prevent falls in wet or icy conditions and provides an additional layer of safety, especially in high-traffic areas.
By following these detailed steps and considerations, you can ensure that your stair installation is not only aesthetically pleasing but also safe and compliant with building standards. Properly installed treads and risers will enhance the durability and functionality of your staircase, while thoughtful design choices, like rounded edges and appropriate spacing, will minimize the risk of injury for years to come.

Finishing Touches
You’ve made it to the final stage of building your deck stairs! Now, it’s time to ensure your hard work not only looks great but also stands the test of time and adheres to New Zealand’s building regulations. In this step, we’ll walk through adding any necessary features, protecting your stairs from the elements, and conducting essential safety checks.
Adding a Handrail (If Necessary)
Before completing your project, check whether a handrail is required based on New Zealand’s building codes. According to regulations, if your stairs have a rise (the vertical height from the ground to the top of the deck) of more than 1 meter, you are required to install a handrail. This is not only to meet legal requirements but also for the safety of those using the stairs, particularly children or the elderly.
How to Install a Handrail
1. Measure the Height and Length: Determine the height of the handrail by measuring from the base of the stairs to the top post. Typically, handrails are mounted between 900mm to 1100mm above the pitch line of the stairs.
2. Secure the Posts: Place handrail posts at the top and bottom of the stairway. Ensure they are level and secure them using heavy-duty screws or bolts.
3. Attach the Handrail: Choose a sturdy material, such as treated timber or metal, for the handrail. Align the rail with the posts and fasten securely. Make sure the rail is smooth and free from any splinters or sharp edges.
If you’re not sure whether a handrail is necessary or how to install it, consult a local builder or refer to the New Zealand Building Code for more specific guidance.
Sealing and Staining for Protection
New Zealand’s climate, with its intense UV rays and variable weather, can take a toll on outdoor timber structures. To ensure your deck stairs last for years without warping or cracking, it’s vital to seal or stain the wood. This will protect it from moisture, prevent rot, and reduce fading from UV exposure.
Choosing a Weatherproof Sealant or Stain
- Weatherproof Sealants: These products form a protective barrier on the surface of the wood, preventing water from seeping in. They’re especially useful in areas with high rainfall or exposure to moisture.
- Stains: A stain not only enhances the natural beauty of the wood grain but also offers some level of protection from UV damage. Opt for a stain that’s designed for outdoor use and can withstand New Zealand’s climate.
Eco-Friendly Options
There are plenty of eco-friendly sealants and stains available in New Zealand that provide excellent protection while being kind to the environment. Look for products labeled as low-VOC (volatile organic compounds) or water-based, as they emit fewer harmful fumes. Some popular eco-friendly brands in New Zealand include Natural House Co. and Resene Woodsman, which offer environmentally responsible options that don’t compromise on durability.
Final Safety Checks
Now that your stairs are built and sealed, it’s time for a thorough safety inspection. This step is crucial to ensure your stairs are not only aesthetically pleasing but also completely safe for regular use.
Things to Check
1. Loose Screws or Nails: Walk around your stairs and check for any screws or nails that may have become loose during the construction process. Tighten or replace any that are not secure.
2. Wobbly Steps: Step on each tread to ensure there’s no wobbling or movement. If any of the steps feel unstable, reinforce them with additional screws or brackets.
3. Uneven Surfaces: Ensure all steps are level and smooth. Any uneven surfaces could become tripping hazards, particularly if the wood expands or contracts with changing weather conditions.
Pro Tip: Walk up and down the steps several times to get a feel for their stability. If the stairs creak or shift in any way, you may need to make additional adjustments.
By taking the time to carefully finish and inspect your stairs, you’ll ensure they remain sturdy, safe, and visually appealing for many years. Following these steps will help you comply with New Zealand’s building regulations while giving you peace of mind that your stairs are well-constructed and weather-resistant.
In conclusion, adding the final touches such as a handrail, sealing or staining, and conducting thorough safety checks are all essential steps to completing your deck stairs project. Not only will these finishing touches enhance the appearance and longevity of your stairs, but they will also ensure that your new outdoor feature is safe and compliant with local regulations.

Maintenance Tips For Deck Steps
Taking care of your deck steps is essential for both safety and longevity. Neglecting regular maintenance can lead to serious safety hazards, particularly if you live in regions with wet weather, such as New Zealand. Below are some practical tips to help you maintain your deck steps in top condition.
Regular Inspections
Frequent inspections are the first step in maintaining your deck steps. It’s important to check for any signs of wear and tear, especially after periods of heavy use or harsh weather conditions like wet winters. Pay close attention to cracks, splinters, loose nails, or any signs of decay. Early detection of these issues can prevent more costly repairs later on and, more importantly, keep your deck steps safe for you and your family. Set a regular schedule to inspect your deck steps, and always do so after a heavy storm or unusual weather pattern to catch any immediate damage.
Cleaning Tips
Keeping your deck steps clean is not just about aesthetics; it’s crucial for safety, too. In areas with high moisture or frequent rain, such as New Zealand, deck steps can quickly become slippery with moss, algae, or mildew. Regularly cleaning the steps can prevent these buildups. A good scrub with a deck cleaner and a stiff brush every few months should do the trick. Pay extra attention to shaded areas where moss and algae thrive. If you notice stubborn spots, a pressure washer can help, but be cautious not to damage the wood. Additionally, keeping debris like leaves and dirt off the steps can prevent moisture from getting trapped, which leads to rot and slipperiness.
Repairing Damaged Steps
Over time, even well-maintained deck steps may need repairs. If you notice loose nails or screws, it’s essential to fix them immediately to avoid accidents. Replace any missing or corroded fasteners with rust-resistant screws for extra durability. For cracked or rotting treads, it’s better to replace them sooner rather than later. To replace a tread, remove the damaged board carefully and ensure the underlying structure is sound. If it’s not, repair or reinforce the frame before installing the new tread. Sand down any rough edges and apply a protective finish to extend the life of the wood.
By following these maintenance tips, you’ll not only keep your deck steps safe and sturdy but also prolong their lifespan, allowing you to enjoy your outdoor space worry-free for years to come.
Common Mistakes To Avoid
Building a deck is an exciting project, but even small mistakes can turn it into a costly or frustrating experience. Below are some of the most common pitfalls homeowners encounter during deck construction, along with tips on how to avoid them.
1. Skipping Permits
One of the biggest mistakes people make when building a deck is skipping the permitting process. While it may seem like a hassle to get the necessary approvals from local authorities, failing to do so can lead to significant problems down the road. In many areas, building a deck requires specific permits to ensure it meets safety standards and complies with local building codes.
Ignoring this step could result in hefty fines, forced demolition, or even the requirement to rebuild the entire deck. By obtaining the right permits, you not only ensure your deck is safe and up to code, but you also avoid the stress and expense of potential legal issues later on.
- Tip: Always check with your local council to understand the required permits before you start any construction work.
2. Incorrect Measurements
Accurate measurements are the foundation of a successful deck project. Miscalculating dimensions or poor planning can lead to uneven steps, awkward spacing, or a deck that doesn’t fit your space as intended. Even a small error can throw off the entire build, leading to structural issues or an unsightly finish.
To avoid these problems, take the time to double-check your measurements before cutting any materials. Plan out your deck thoroughly, considering things like furniture placement, traffic flow, and building codes that may affect dimensions like stair height or railing spacing.
- Tip: Measure twice, cut once—this age-old advice still holds true when it comes to deck construction.
3. Using the Wrong Materials
New Zealand’s weather can be unpredictable, with its harsh sun, heavy rain, and salt-laden coastal winds. Choosing the wrong materials for your deck can result in quicker deterioration and increased maintenance over time. Some homeowners may be tempted to cut costs by using cheaper, less durable materials, but this often leads to more significant expenses in the long run.
Inferior materials can warp, rot, or fade quickly, compromising the structural integrity and aesthetic appeal of your deck. Always opt for high-quality, weather-resistant materials that can withstand New Zealand’s unique environmental challenges. For instance, treated timber, composite decking, or weather-resistant hardwoods are popular choices for long-lasting durability.
- Tip: Invest in quality materials from the start to save on repairs and replacements later.
By avoiding these common mistakes, you’ll ensure your deck-building project goes smoothly and results in a beautiful, safe, and durable outdoor space that you can enjoy for years to come.

FAQs: About How To Build Steps For A Deck Nz
What are the basic steps to building deck steps in New Zealand?
Building deck steps involves several key stages: measuring the rise (height) and run (depth) of your steps, cutting and installing stringers, attaching treads, and optionally adding risers. You’ll also need to consider securing the steps to footings and ensuring everything complies with NZ building regulations.
What materials are best for building deck steps in New Zealand?
Treated pine, hardwoods like kwila or macrocarpa, and non-slip materials are excellent choices for deck steps in New Zealand. These materials withstand the country’s variable weather conditions, including rain and UV exposure. Using durable timber and non-slip surfaces helps ensure safety and longevity.
Do I need building consent for deck steps in New Zealand?
In many cases, you won’t need a building consent for low-level decks (under 1.5 meters high) and their steps. However, if the steps are attached to a higher deck or if they are part of a more complex structure, a building consent might be required. Always check with your local council for specific rules and regulations.
How do I measure for deck steps?
To measure for deck steps, first calculate the total rise from the deck to the ground. Then, divide the rise by the desired step height (usually 180mm) to determine the number of steps. Next, calculate the total run by multiplying the number of steps by the tread depth, which is typically around 270mm.
What safety features should I consider when building deck steps?
Safety is key when building deck steps. Consider adding non-slip treads or finishes, especially in NZ’s wet climate. A handrail may be required for steps with a rise of more than 1 meter. Ensure proper spacing between steps to avoid tripping hazards, and check that all connections are secure.
How deep should the treads be on deck steps?
The treads on your deck steps should generally be around 270mm deep to provide a comfortable and safe footing. This depth complies with common building standards in New Zealand and offers enough space for proper step functionality.
Can I build deck steps on uneven ground?
Yes, you can build deck steps on uneven ground, but you’ll need to adjust the footings to ensure they are level. This might involve digging deeper holes and using concrete footings to secure the stringers. Proper leveling ensures the steps are stable and safe.
How long does it take to build deck steps?
The time required to build deck steps depends on your skill level and the complexity of the project. For a simple set of steps, it can take one to two days, including preparation, measuring, cutting, and assembly. Larger or more complex projects may take longer.
Can I build my own deck steps without professional help?
Yes, building deck steps is a manageable DIY project for those with basic carpentry skills. However, if you’re unsure about measurements, building codes, or safety requirements, consulting a professional or seeking assistance from a builder is advisable.
What is the cost of building deck steps in New Zealand?
The cost of building deck steps varies depending on the materials used and the size of the project. For basic treated pine steps, the cost could range from $200 to $500, while using higher-end hardwoods or adding extra features like handrails may increase the price. Don’t forget to factor in costs for tools and hardware.
Conclusion
In conclusion, building your own deck steps can be a rewarding and straightforward process when broken down into manageable steps. By following the outlined guidelines, you’ll have a safe, durable set of stairs that enhances both the functionality and appearance of your outdoor space. Don’t hesitate to personalize your deck stairs with unique touches like lighting, decorative railings, or even planters to reflect your style. Ready to get started? Whether you’re tackling this project on your own or seeking advice from a local contractor for more complex designs, now is the perfect time to begin. Don’t forget to bookmark this guide for easy reference or share it with friends who might also find it helpful!
About the Author:
Mike Veail is a recognized digital marketing expert with over 6 years of experience in helping tradespeople and small businesses thrive online. A former quantity surveyor, Mike combines deep industry knowledge with hands-on expertise in SEO and Google Ads. His marketing strategies are tailored to the specific needs of the trades sector, helping businesses increase visibility and generate more leads through proven, ethical methods.
Mike has successfully partnered with numerous companies, establishing a track record of delivering measurable results. His work has been featured across various platforms that showcase his expertise in lead generation and online marketing for the trades sector.
Learn more about Mike's experience and services at https://theleadguy.online or follow him on social media: